Do you have a Facebook business page for your business? If not, you are missing out on one of the most effective and free ways to advertise your business on the internet today. Learn the what, why, and how to create effective Facebook business pages within minutes using the first article in our series.
What Are Facebook Business Pages?
A Facebook business page is a free public profile for your business that you can use to promote your company, products, services, announcements, news, promotions, and much more. Facebook users can search for your business and find out your location, hours of operation, write or read reviews, leave you a message, subscribe to your email list, and even call you instantly right from your page. Check out our business page to see a sample of what you can do once you get rolling:
https://www.facebook.com/tppwebsolutions/
Why Do I Need Facebook Business Pages?
Facebook is one of the most populated solution media platforms. Our total world population is around 7.6 billion. Out of that, almost 2.7 billion users have accounts on Facebook. This huge number speaks for the fact that whatever you upload on Facebook has high chances of maximum public exposure.
According to survey statistics, nearly 68 percent of US adults are engaged with Facebook in one way or another. This number is 40 percent higher than that of Instagram for the same US audience.
Considering these figures, Facebook is a great opportunity for free and fruitful business marketing. So even if you are not a regular user of Facebook, the benefits of setting up Facebook business pages are well worth the effort.
How Do I Create Facebook Business Pages?
Although it may seem a bit intimidating to create one, it is actually a quite simple task that you can complete within minutes by following the steps below.
PREPARATION
Before we get started, prepare the following items to make this as efficient as possible.
Click on an item below for details.
Your business page name will end up being www.facebook.com/somename/ so it’s vital that you decide in advance what name you want to use. Changing it later can be a very frustrating process. We recommend reading the article below that gives the strict guidelines of what is allowed, then write down at least 2 choices in case one is already taken.
https://www.facebook.com/help/519912414718764/?ref=cr
Here is a few additional tips for choosing the best name for your Facebook business pages:
- Always go for either your company name or your brand name.
- Avoid using punctuation; ensure it is something that someone can easily remember.
- Avoid using a website domain like www.facebook.com/yourcompany.com/.
- Write down at least two choices, in case your first choice is already taken.
During the setup process, it will give you the option to include various information about your business. We recommend having the following prepared in advance:
- A short description about your company.
- Your business contact information including address, phone number, hours of operation, and optional email address.
There are two main branding areas for a business page. We recommend having these ready for upload:
- Profile picture: A square version of your company logo or similar works best.
- Cover picture: Go for a comprehensive banner-like picture which pin-points your business. This can be a photo, a graphical representation of your products & services, or similar.
Don’t be too concerned about your images being too large. You can crop and shrink them down after you upload them. However, images that are thumbnail size are too small.
In order to best manage your new business page, you will need to ensure you already have a personal account setup. If you don’t have any interest in using the personal account, you can always set it to PRIVATE and strictly use it for managing your page. Simply go to Facebook.com and follow the steps to register. If you already have a personal account, you can skip this step.
Now that you have your assets ready and you are logged into Facebook, lets get started on creating your new page. If you make a mistake during setup, don’t worry. You can make editing changes at anytime once the page setup is complete.
STEP 1 – Creating Your Page
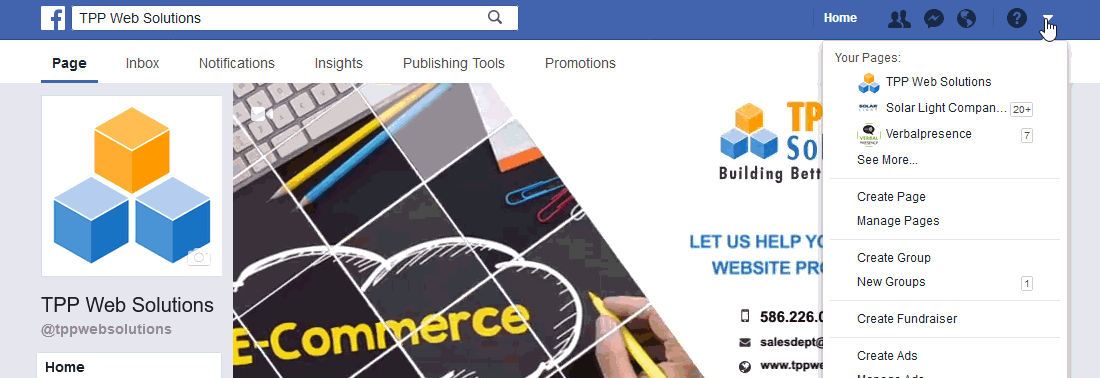
a. Start by locating the drop down arrow in the top right of your screen and click it. Then scroll down and click the “Create Page” link.
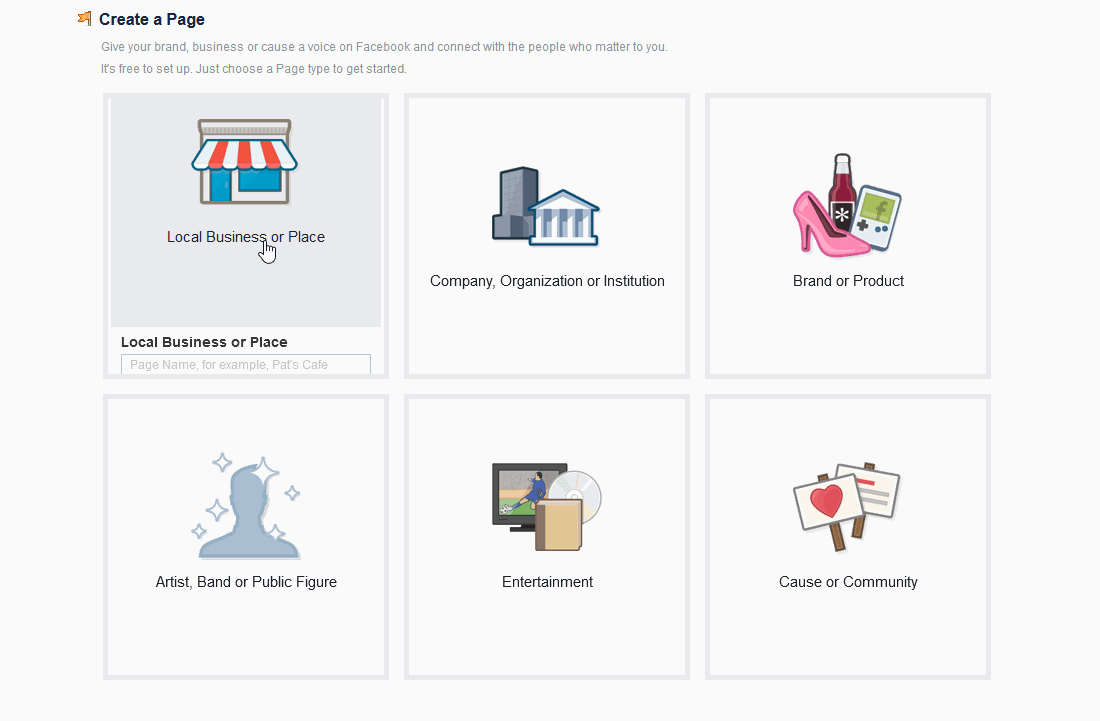
b. The category selection page has 6 categories to choose from. Choose the one that best matches your business needs. You can always change this later.
If you are unsure, here are some tips:
- Local business or place: Use this option if you have a public business location, or an online website. This is our recommended choice for most.
- Company, organization, or institution: Use this option if you have multiple locations and just want an online presence.
- Brand or product: Use this option if you just want to create a page specific to a product or brand. We only recommend this as an option for secondary business pages, as it doesn’t have as many options.
The remaining 3 options are mainly used by entertainers, artists, or specific causes.
c. Enter your general information and click “Get Started” to move onto the next step.
STEP 2 – Add Your Company Information
Now it’s time to tell the world about your company. Careful completion of this step is very important since it is one of the ways to introduce your business to the public. It’s just like any other business profile. Keep the information concise but comprehensive.
PLEASE NOTE: Depending upon which option you choose above, the order of steps below or information requested may vary.
Select up to 3 categories that pertain to your business.
- Add the short description for your business that you created earlier.
- Add your selected business page name URL; if your selected username is @acmecompany, then your business page URL will eventually be www.facebook.com/acmecompany/ .
- Add your business phone number and hours (if applicable).
- Add the URL to your business website to validate your authenticity in the eyes of the audience.
There are many more ways to customize the “About Us” section for your business page, but these are the most important for getting you up and running. If you want to check out the other fields available, just click the ‘ABOUT’ tab on the right column. On the following page, click the “edit page info” link on the right.
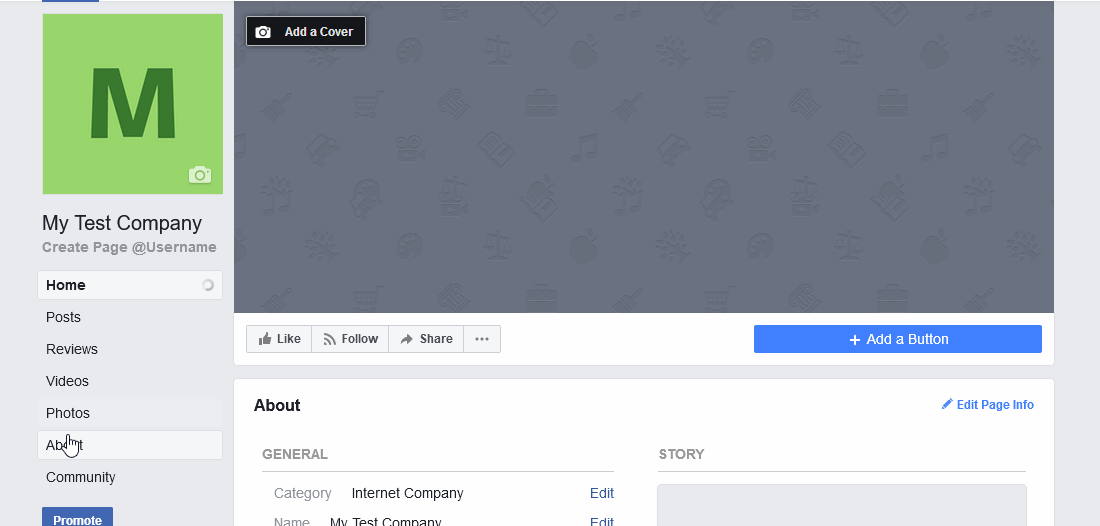
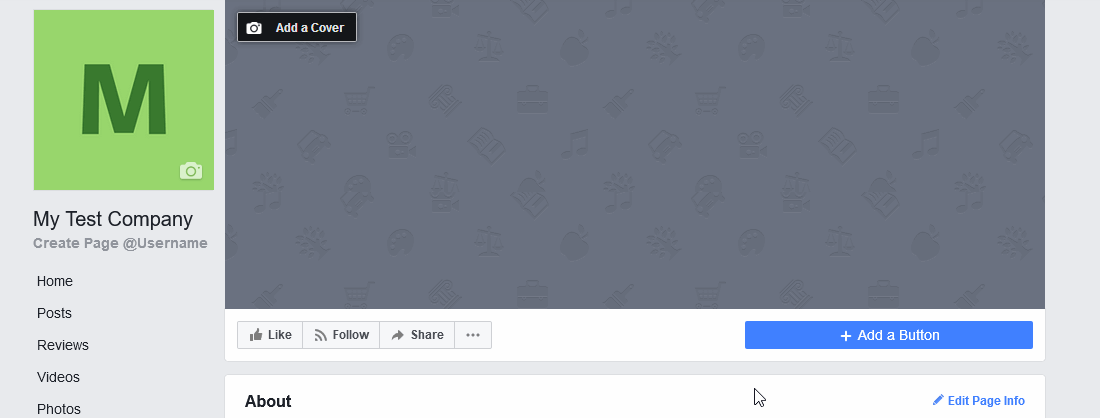
STEP 3 – Company Branding
Just like any other business profile, your profile picture matters on Facebook pages. Where a tantalizing profile picture attracts more people to visit your page and generate maximum organic traffic, a good cover photo creates a certain vibe specific to your business only. This is where your assets preparation comes into play. Upload the following:
- Profile photo: This is the small square area that shows to the left above your page name.
- Cover photo: This is the background image that shows above your business page.
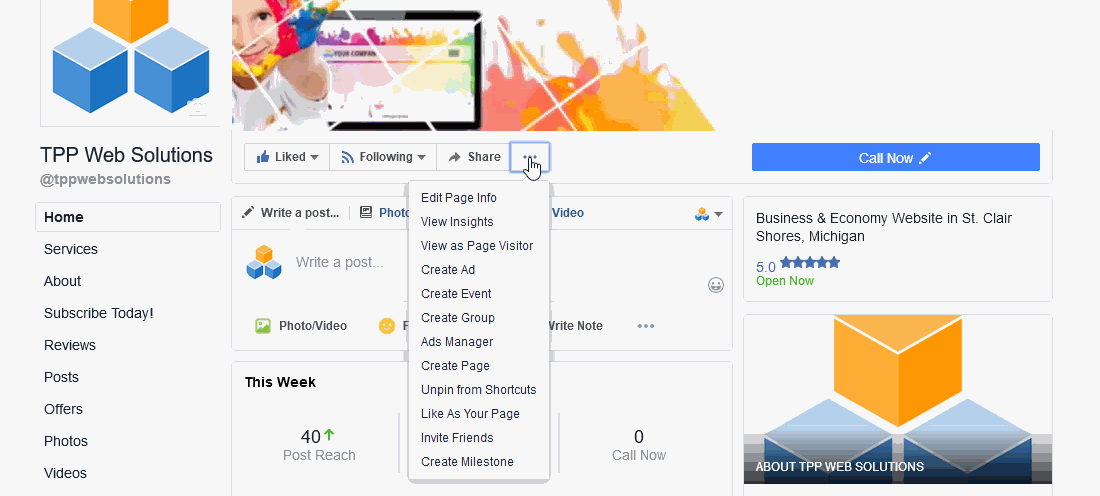
STEP 4 – Invite friends to increase page exposure
Once you’re done uploading necessary content, it’s time to invite your friends to ‘Like and Subscribe’ to your page. This not only helps you start to announce to the world that you have a new business page, but also helps on getting those necessary 25 “likes” needed to claim your vanity URL (link). From your business home page:
a. Click on the ‘…’ button below your cover photo, then scroll down and click on the ‘Invite friends’ option.
b. Select as many friends as you want from your friend’s list to send page invitations.
Conclusion
Facebook business pages will let you accomplish so many of your business goals through its unlimited exposure and free marketing. If you are looking for a quick and promising way to boost your business, setting up a Facebook business page must be included in your strategy.
Stay tuned for the next part of our series, which will cover more advanced customization, finalizing your “vanity URL”, proper use of templates, tips on posting, creating administrators, getting started with Facebook Ads, and much more.

Leave a Reply
You must be logged in to post a comment.