The world has evolved so much through technology and even better is the invention of social media. Before the advent of social media, business proceedings were done, but there was the challenge of reaching a whole lot of people at the same time. Now, all you have to do is create a Facebook business page and you can reach thousands, if not millions, of people at the same time.
What exactly is a Facebook business page?
From our previous article, “Facebook Business Pages – Part 1: The What, Why and How to Create One”, you can deduce that a Facebook business page is a free public profile for your business that you can use to promote your company, products, services, announcements, news, promotions, and much more.
https://tppwebsolutions.com/creating-facebook-business-pages-part1/
In the first article, a lot was learnt about what a Facebook business page is, why it is necessary, and how to create one. Here, we will go deeper into how to set up your Facebook business page for business branding.
The advanced facebook branding tips you were promised
Tip 1 – Claim Your Facebook Vanity Domain
The first thing you need to do is to claim your Facebook vanity domain. When a Facebook business page is created, Facebook allocates a URL to the account owner. This URL allocated by Facebook might not have an appealing look and may not contain details about the business name or what the page is about. This might make it hard to find your page or even to share your URL with people. This is why you need to claim a personal URL for your business.
For example, Facebook may allocate a domain that looks like this: http://www.facebook.com/pages/tppwebsolutions/163393421020179?ref=ts . Looking at this URL, we can deduce that it looks quite messy and it is not advisable to have this put on your website or magazines when advertising your business. Instead, it will be more appropriate to have a URL that looks more like this: http://www.facebook.com/tppwebsolutions.
Now how do you claim your Facebook vanity domain?
This is easier than it seems, to be honest; it is as easy as claiming your birth-right. Maybe that’s a terrible example, but the point is to let you know that you don’t have to stress yourself about claiming this new domain. All you need to do is follow these steps:
- Go to facebook.com/username
- Select “Select a Username” for your page
- This brings up a dropdown menu, select the page you want to create the username for.
- If your page has the needed 25 fans, it will bring up a box.
- Enter your desired username and click on “Check Availability.”
- If it’s available, you will be shown some final terms – if you are happy with your choice click “Confirm”; if you’d like to try another, click “Cancel”.
Tip 2 – Expand Your About Us
Knowing how to claim your vanity domain is important for obvious reasons which were discussed above; however, that is not the only thing you need to do to get your brand up and running. After claiming a domain that is unique to your business, you need to start thinking about what you want your brand to be known for and how to get people interested in your page.
This means that your why has to be stated boldly, your products have to be well labelled, and your page has to make people want to come back. Most importantly, your page has to be as straightforward as possible. Trust us; you don’t want so many irrelevant things on your page as that will bore your customers away.
One of the most important information that needs to be on your page is your contact information. Your address, your email, phone number and so on should all be stated boldly on your page. Just think of it as instead of having to hand out business cards to thousands of people, all you have to do is hand it out once on your Facebook business page.
What if you need to edit a missing detail?
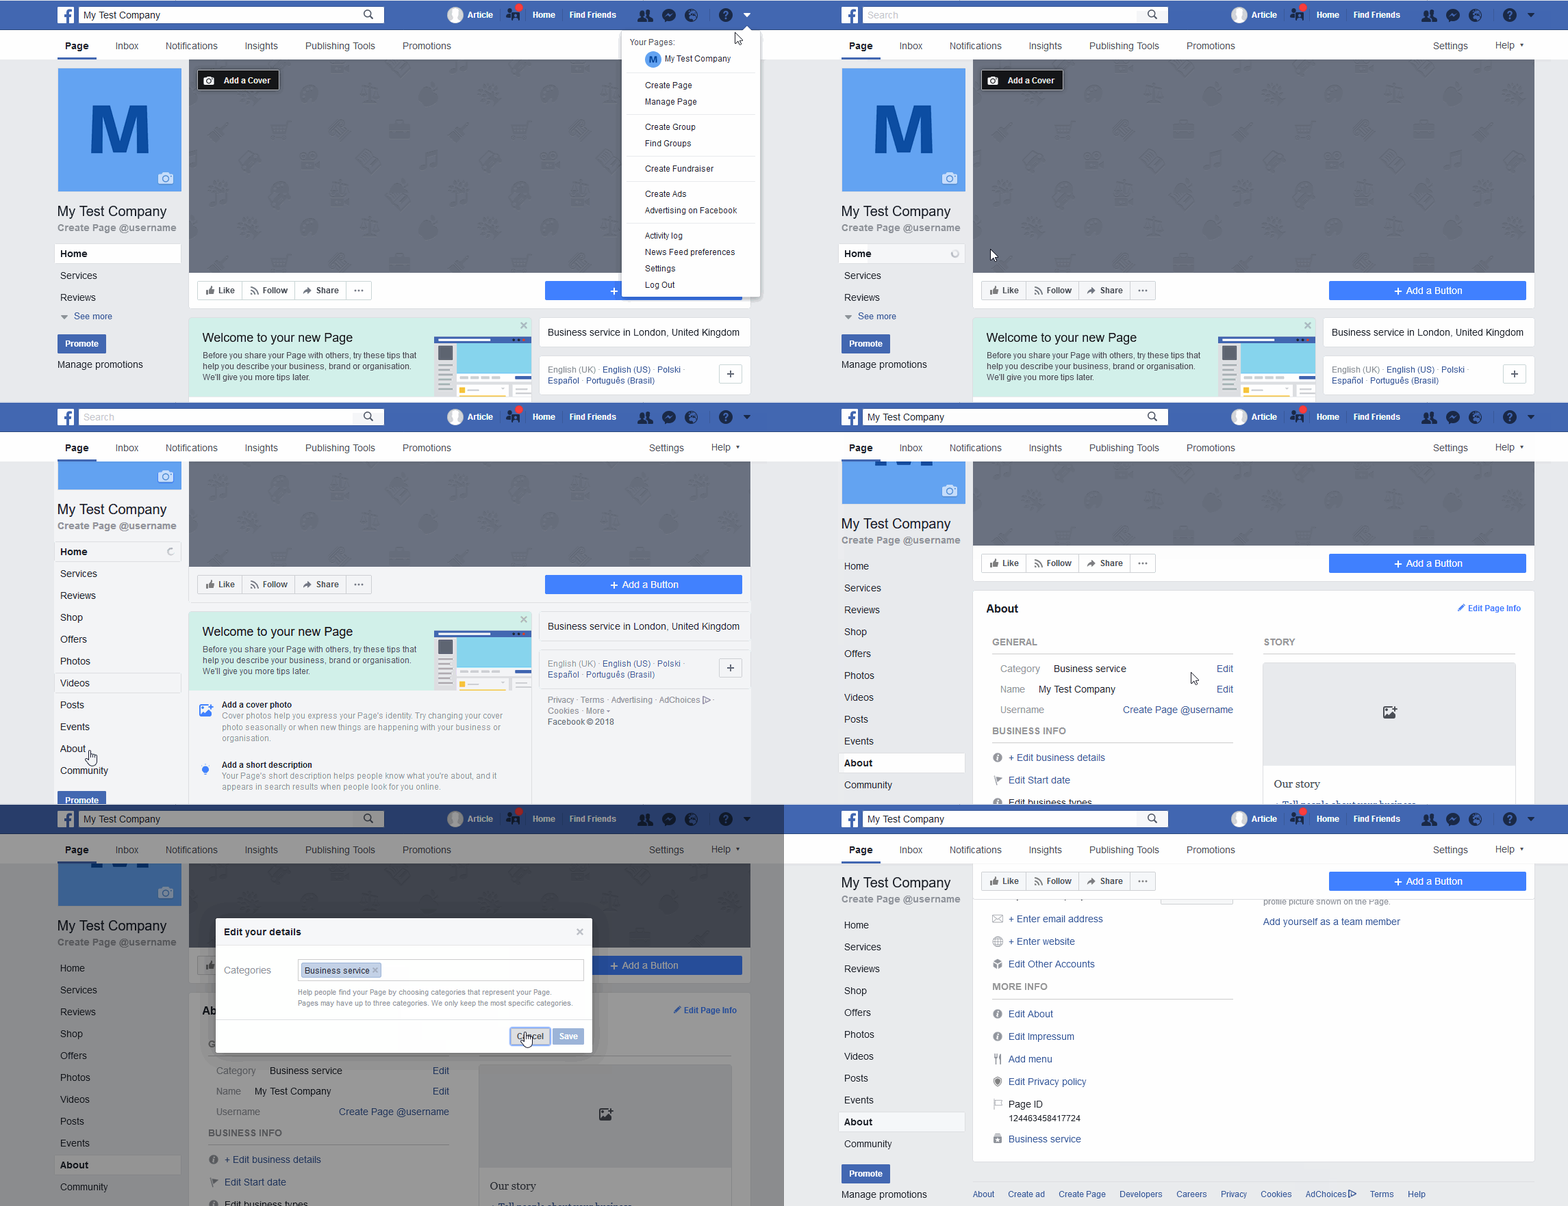
Do not fret; instead simply navigate to your page:
- Click on the down arrow at the top right corner of your Facebook browser.
- Then click “Use Facebook as [Your Page].” From there, you should be taken to your page, where you can then
- Click on the “About” tab and make edits. You’ll be able to make edits if you hover your cursor over the section you want to modify, and then
- Click “Edit.”
Voila, all is fine again, and you can edit and add whatever you want to the page.
Tip 3 – Using Facebook Business Page templates
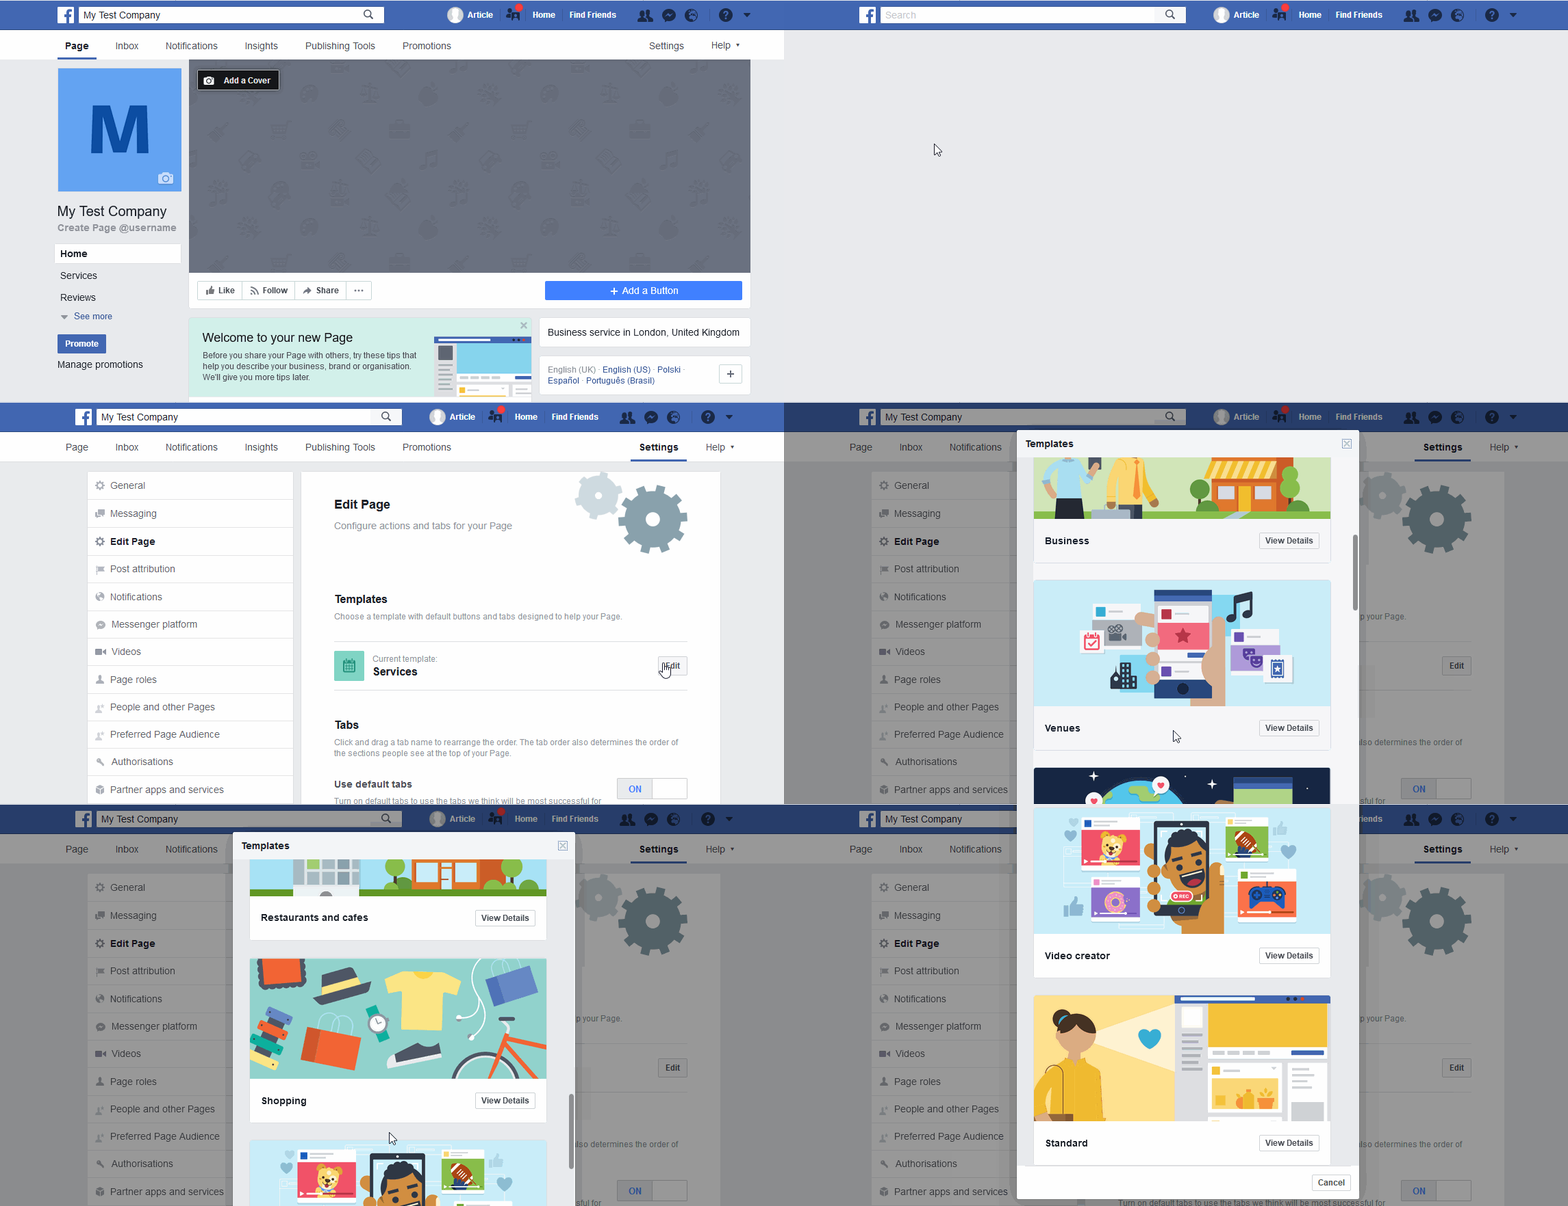
Templates serve as a preset format for your business page. The steps to finding these templates are:
- Go to your Facebook business page
- Click on Settings
- Click on Edit Page
- Under that Template option, click on Edit Template
Some of the templates types on Facebook include:
Standard:
This template can be used for any business type. It is created for various business types. If you have something specific in mind, then it will be advisable to choose one more specific to your purpose.
Services:
This template, as the name implies, can be more suitable for you if your business is about rendering services. Services might include collecting building contracts or any form of contract that involves you being the middleman between your clients and your workers.
Business:
This should be considered by business owners who are willing to put their brands out there. Since this template is specifically made for business operations, it will be advisable that business owners follow and use this template for branding their products.
Restaurants and Cafes:
This one is for food business owners. It helps promote the kind of food that is being sold, the amount of the food, and how to place orders if that option is available.
Venue:
Venue owners who are willing to sublet or rent out their venues can do so via Facebook. All they need to do is use this template to set up their business. This template helps in creating more awareness for their page and how to reach them for booking.
Tips on how to choose a suitable template:
- Consider what your business is about
- Check if there is a specific template for your kind of business
- If not, consider using the Standard template
Tip 4 – What are Business Page Tabs?
These are custom made tabs such as Events tab, About tab, and so on that can be added to your business page. To configure your own business page tab,
- Go to the App Dashboard and then select “Settings”
- After this, click on “Basic”
- Click on the Add Platform button
- Then choose Page Tab from the dialog
- Now, a new setting can be configured for your new tab
Note that before you can be allowed to create tabs at all, your page has to have at least 2000 fans.
Tip 5 – Adding A Button
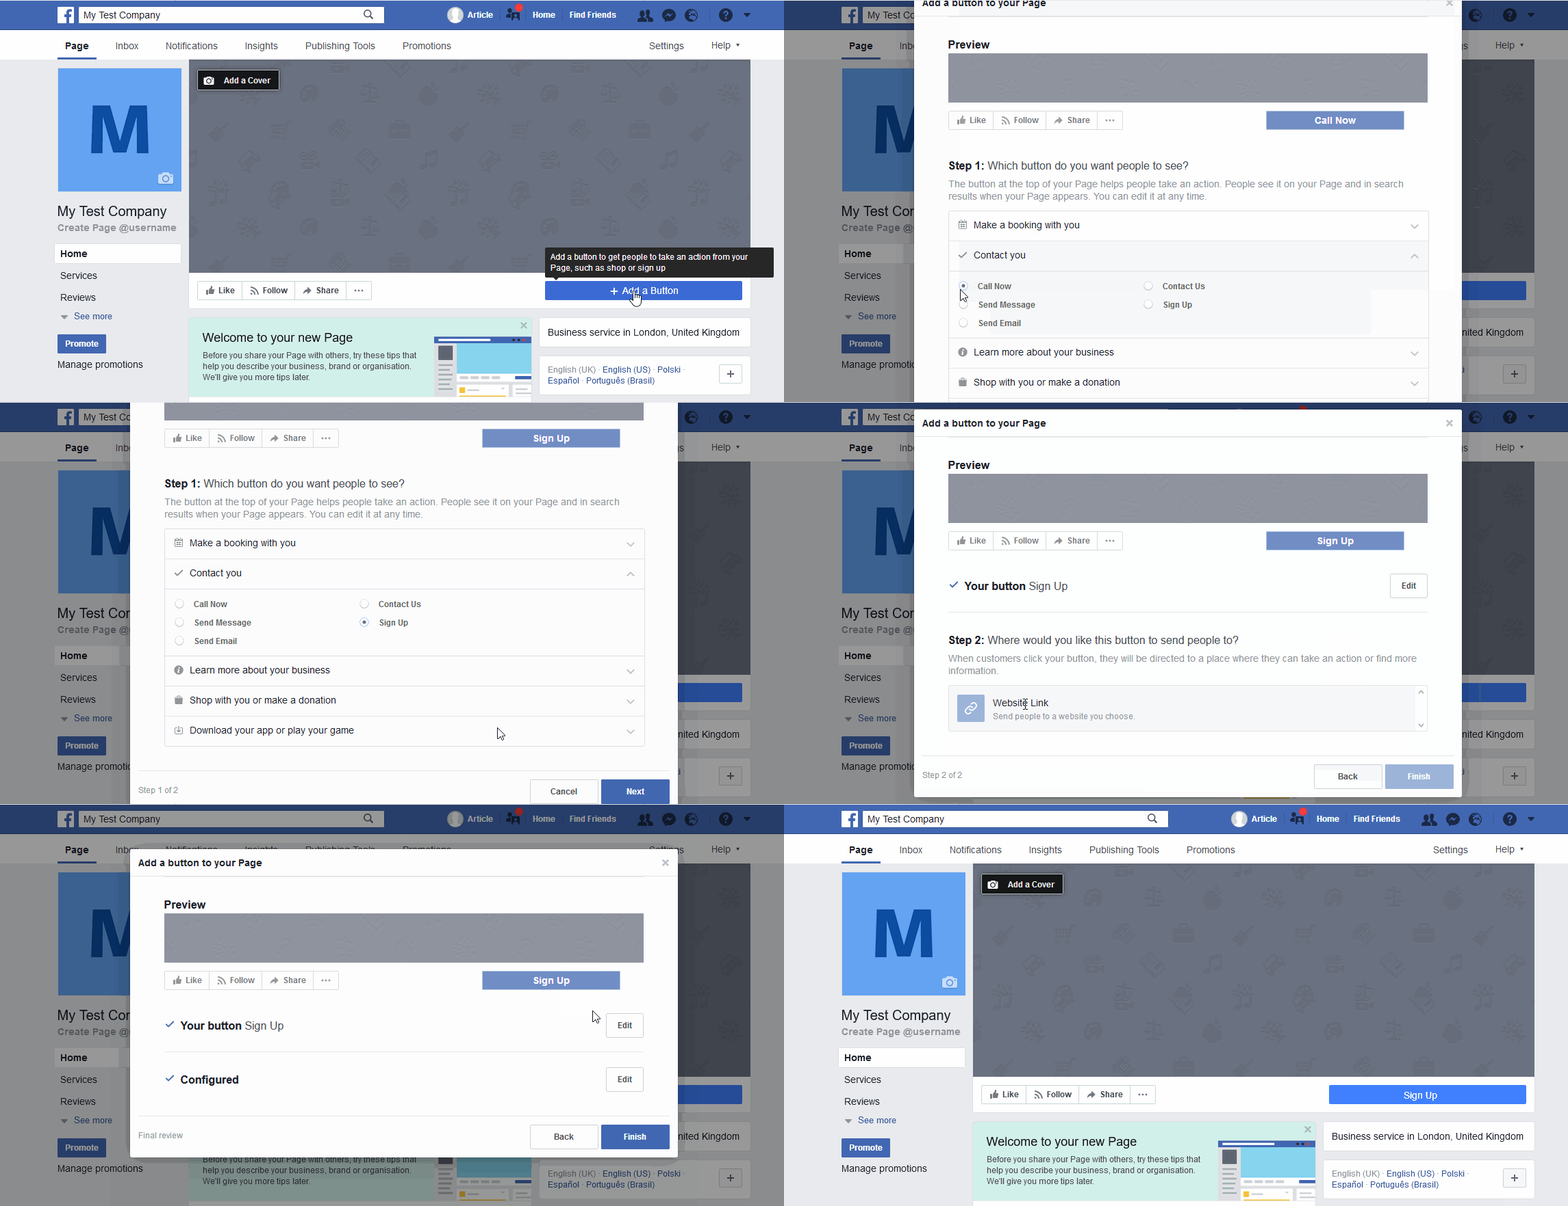
This can only be done by the person in charge of the page, that is, the admin. Adding this button helps you get your customers to communicate with you better. Steps involved in adding a call-to-action button to your page
- Click on “Add a button” right below your page’s cover photo
- Select a button from the drop-down menu and fill out any required information
- Click “Add button.”
Tip 6 – Customer Messaging
As a business owner, you would like to get feedback from your customers. With customer messaging, you can interact with your customers to know what they want and how you can improve your services. All you need to do is to:
- Select the call-to-action button named “Send Message”
This button helps to initiate conversations between the business admin and the customers. When this button is clicked on by a customer, the Facebook messenger windows opens allowing the person to compose and send messages to the business page. Then when you get the message, you can easily reply by sending your own message to the customer.
Tip 7 – Featured Services and Products
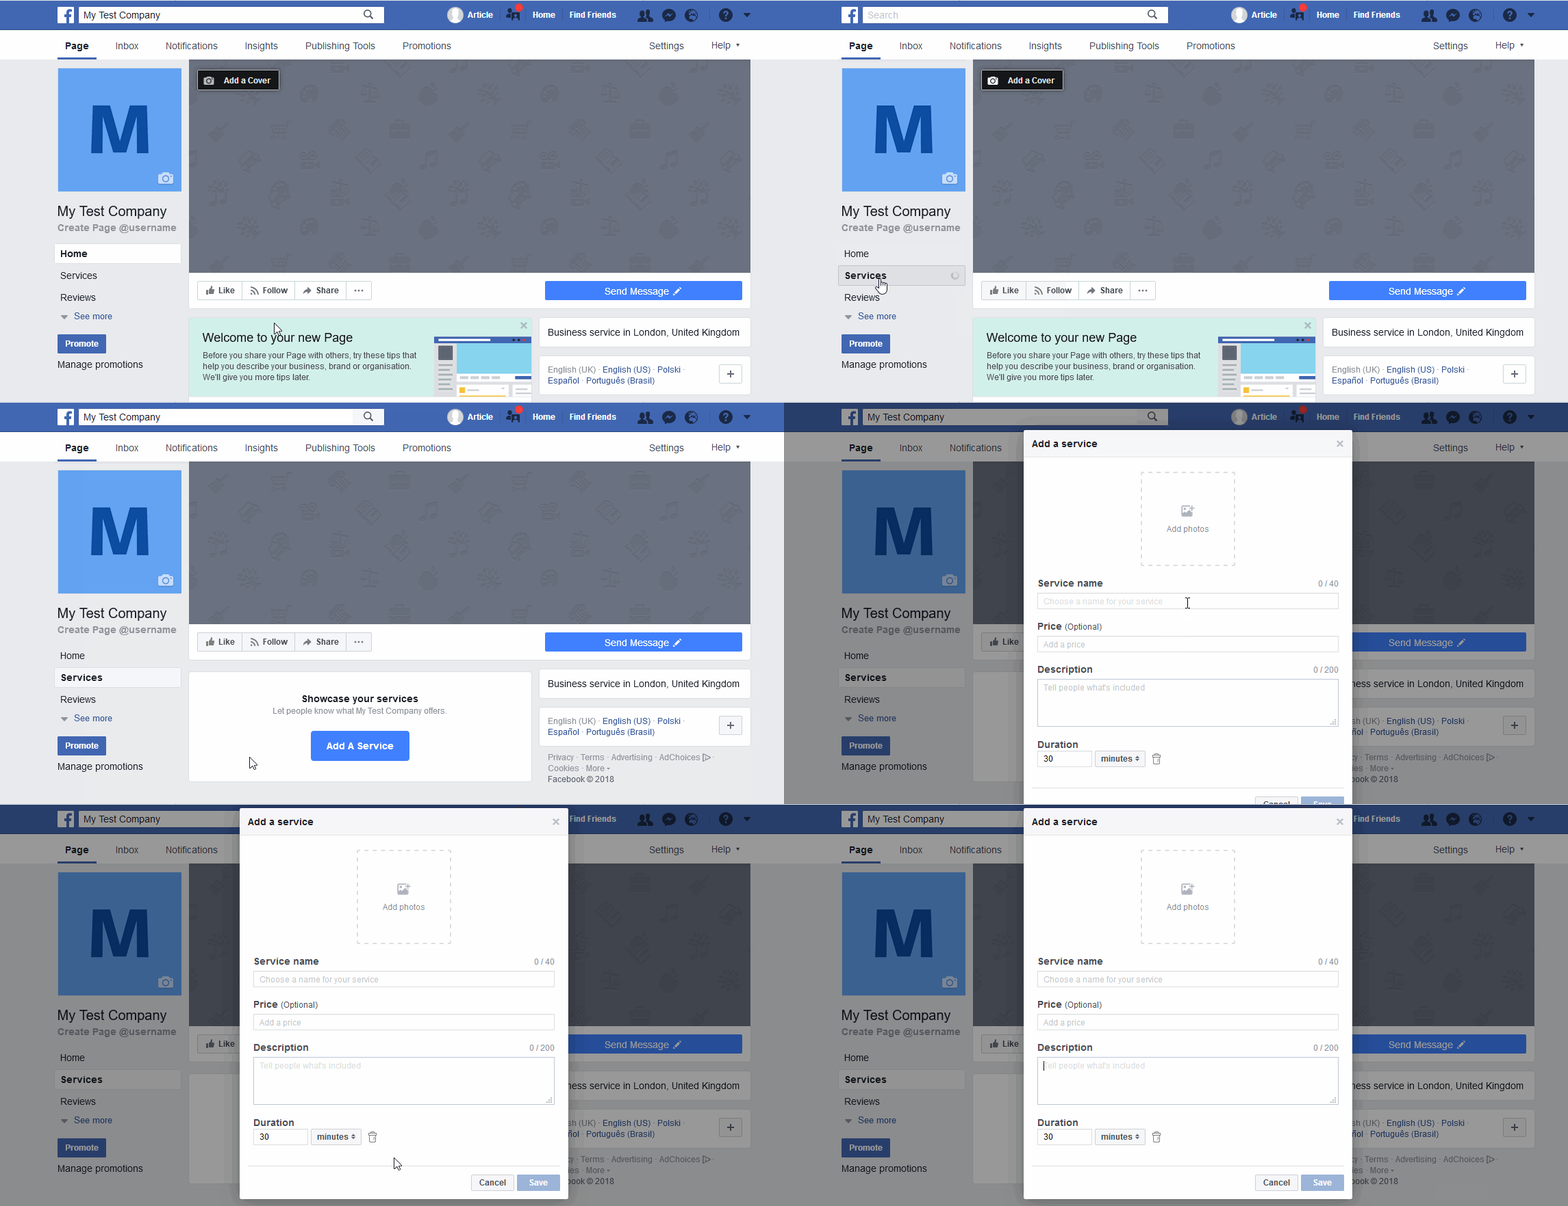
Below your cover photo, you can select a service tab which will help improve your business information. Steps involved in using these services are:
- Click on the Service tab below your cover photo
- After that, fill in the “Add a service” page
- Then publish your Services tab
It should be noted that more than one service can be added to your page; images can also be added to those services.
Adding features products or services are a great way to show your customers highlights of what your company can offer them. Here is an example of what we did for ours.
Tip 8 – Better Branding – Profile Photo, Cover Photo, and Cover Video
For the best form of branding, you have to consider using the best image that will depict what your business is about. The image considered has to be 820px wide and 312px tall. This is important since images are essential when it comes to branding your business. Even better is using a cover video. This is a new feature on Facebook and instead of using just one image to depict what your business is about; you can do it better by wowing them with a short video clip instead. This short clip can be between 20seconds to 90seconds long. This will be covered in detail in the next article.
Conclusion
With Facebook business pages, not only will you be able to accomplish your goals and boost your business, but also have a lot of fun doing it. If your goal is to promote your business in this era, then you cannot dismiss the fact that you need social media to do it. And more importantly, you need the largest social media community to make that dream come true.



Leave a Reply
You must be logged in to post a comment.